


How to Install an Undermount Sink: A Step by Step Guide
There is something undeniably sleek about an undermount sink. By mounting the basin beneath the countertop, you eliminate that annoying rim where crumbs and grime love to hide, creating a seamless, modern look that elevates any kitchen or bathroom.
But if you are planning a DIY installation, the thought of hanging a heavy basin entirely from the bottom of your counter can be intimidating. What if it leaks? What if it sags over time?
Do not worry. Whether you are installing a durable stainless steel model or a premium, heavy duty eridanus sink, mastering how to install undermount sink systems comes down to patience, precision, and the right support structure.
In this comprehensive, professional guide, we will walk you through the entire process from prep to plumbing so you can achieve a rock solid, leak free installation.
Before You Begin: The Core Requirements
Unlike drop in sinks that rely on a top rim to distribute weight across the counter, an undermount sink relies completely on the strength of your countertop material and underground fasteners.
Countertop Compatibility
Before buying tools, inspect your countertop material. Undermount sinks require solid surface materials such as granite, quartz, marble, or solid concrete.
⚠️ Warning: Do not install an undermount sink on laminate or tile countertops. The particleboard or plywood core beneath laminate will warp, rot, and fail if exposed to the structural strain and inevitable moisture around the sink rim.
Deciding Your Reveal Style
When learning how to install undermount sink configurations, you must choose how much of the sink rim will be visible through the countertop cutout.
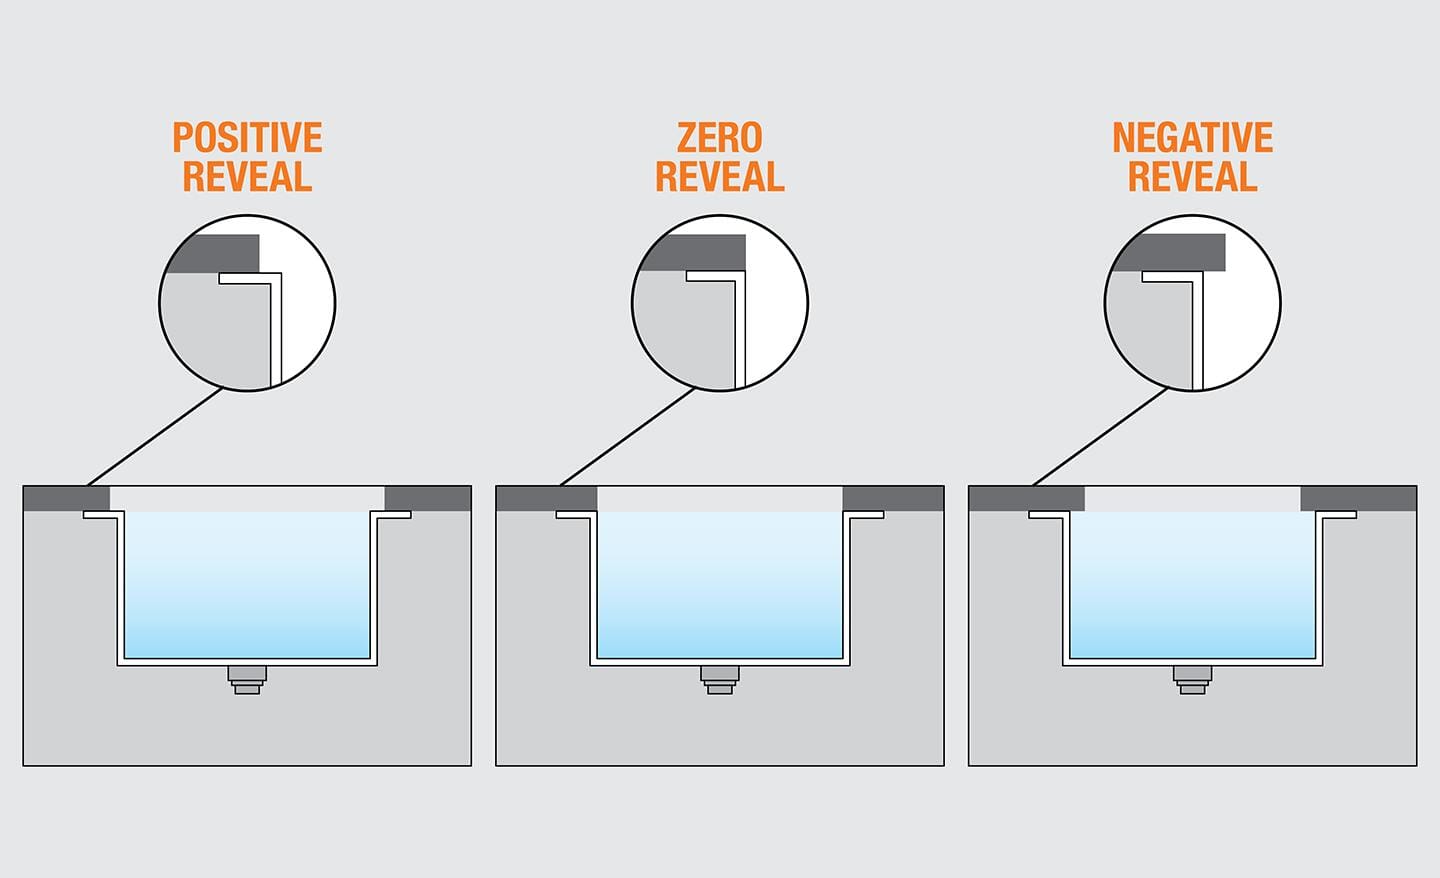
There are three types of undermount sink installation, distinguished by their different “reveal style.” This refers to how much of the sink’s rim remains visible once installed.
- Zero reveal ensures that the edge of the countertop is flush with the opening of the sink.
- Positive reveal ensures that some of the sink’s rim is visible past the edge of the countertop.
- Negative reveal conceals the sink’s rim entirely beneath the countertop, so the countertop edge overhangs.
- Generally, sinks with zero reveal are easier to clean than those with positive or negative reveal. Otherwise, choose a reveal style based on personal preference.
Tools and Materials Checklist
Gather these items before starting to ensure a smooth, uninterrupted project flow.
-
Essential Equipment: Tape measure, Caulking gun, Power drill (with masonry or diamond bits if drilling into stone), Silicon adhesive sealant (100 percent waterproof clear silicone), Utility knife and razor scraper, Safety glasses.
-
Support Hardware: Undermount sink mounting clips or heavy duty epoxy anchors, Two 2x4 wooden boards (for temporary support braces), Bar clamps or a sink harness, Denatured alcohol or acetone, Rags.
The Step by Step Installation Process
If you are replacing an existing unit, make sure to shut off the water valves beneath the cabinet, disconnect the plumbing trap, and use a utility knife to slice through the old sealant to remove the old basin. Scrape away every trace of old adhesive with a razor scraper until the underside of the counter is completely smooth.
If you are installing a brand new eridanus sink onto a newly cut countertop, follow these precise steps:
![]() 1. Dry Fit and Check Alignment
1. Dry Fit and Check Alignment
Before applying any adhesive, place your new basin inside the cabinet base. Raise it up against the countertop cutout to check the fit. Ensure it aligns perfectly with your chosen reveal style (Positive, Zero, or Negative). Mark the exact boundaries of the sink rim onto the underside of the counter using a pencil.
2. Install the Mounting Clips or Anchors
With the basin removed, look at your pencil marks. Space your mounting clips evenly around the perimeter, typically one near each corner and one every 10 to 12 inches along the sides.
-
For stone counters like quartz or granite, use epoxy to attach specialized undermount anchor studs to the underside of the stone.
-
Never drill directly into stone without a diamond bit, and never use standard drywall screws.
![]() 3. Clean the Bonding Surfaces
3. Clean the Bonding Surfaces
Moisture and silicone will not bond to dust or grease. Dampen a clean rag with denatured alcohol or acetone and thoroughly wipe down the top rim of the sink and the underside of the countertop where the rim will meet the stone. Let it air dry completely.
4. Apply 100 Percent Silicone Sealant
Load a high quality, 100 percent waterproof silicone caulk into your caulking gun. Apply a continuous, generous bead of silicone directly along the top surface of the sink rim. Ensure there are no gaps in the bead, as these gaps will turn into future water leaks.
5. Lift, Clamp, and Secure the Basin
This is a job for two people, especially for heavy ceramic or fireclay models like a premium eridanus sink. Carefully lift the basin straight up into position against the bottom of the counter. Thread a bar clamp through the drain hole and attach it to a 2x4 board laid across the top opening of your counter to hold the weight. Tighten the wing nuts on your mounting clips firmly around the rim. Do not overtighten, or you risk cracking the counter.
6. Wipe Away Excess Squeeze Out
As you tighten the clips, silicone should squeeze out of the seam on both the inside of the bowl and underneath. Spray a cloth with denatured alcohol and immediately wipe away the excess silicone to create a clean, crisp joint line.
⏳ The Golden Rule of Curing: Do not remove the clamps, do not reinstall the plumbing fixtures, and do not fill the basin with water for at least 24 hours. Silicone needs a full day to cure completely and develop its maximum structural hold.
Reconnecting Plumbing and Final Inspection
After 24 hours have passed, you can safely remove the temporary clamps and wooden support braces.
-
Install Fixtures: Reconnect your kitchen faucet lines, install the sink strainer basket using a neat ring of plumber putty, and reinstall your garbage disposal if you have one.
-
The Leak Test: Wipe down everything under the cabinet so it is completely dry. Place a dry paper towel directly under the plumbing trap and the sink seam. Fill the basin halfway with water, then pull the plug.
-
Inspect: Check the paper towel underneath. If you see any damp spots, lightly tighten the plumbing slip nuts or look closely at the upper silicone seam to ensure it is airtight.
By taking your time with the measurements, prepping the stone surfaces properly, and utilizing heavy duty mounting clips, your newly installed undermount basin will remain beautiful, stable, and perfectly sealed for decades to come.